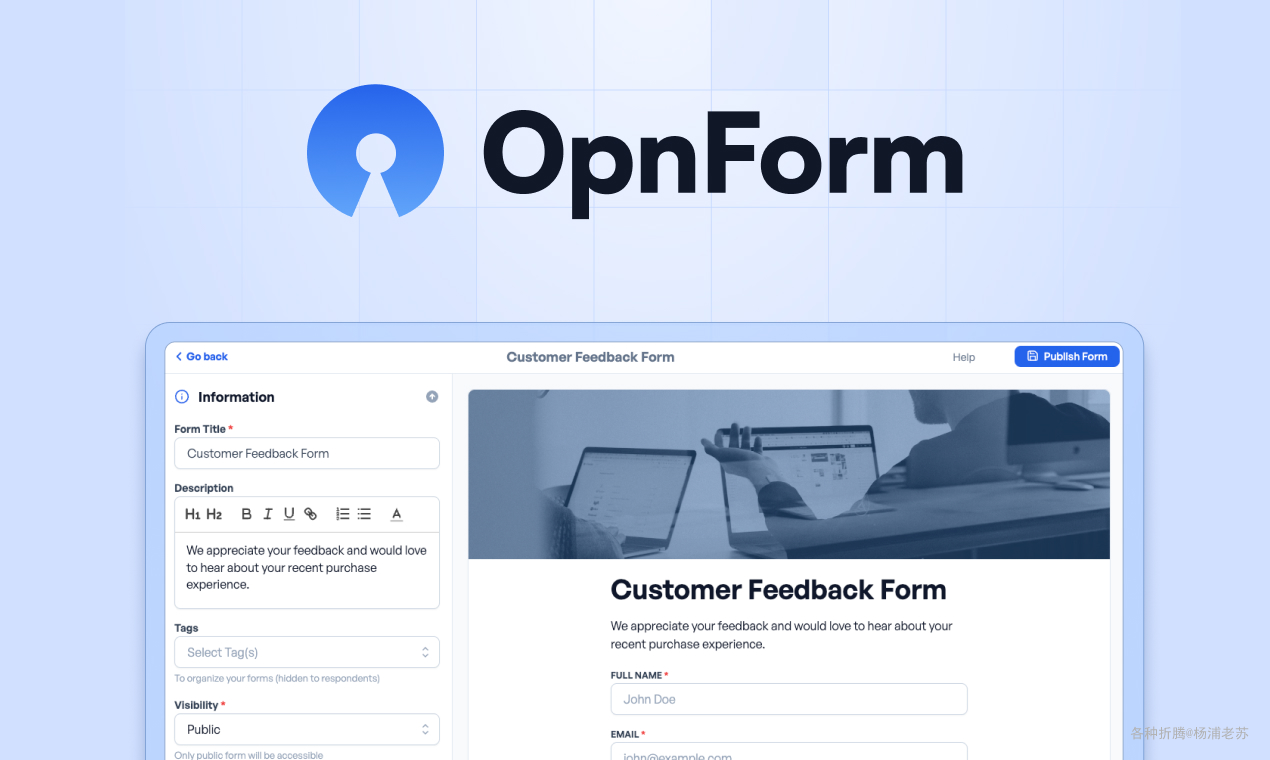
什么是 OpnForm ?
OpnForm 是一个开源的表单构建工具,旨在简化创建自定义表单的过程,特别适合无编码知识的用户。它通过人工智能优化表单创建流程,支持多种用途,如联系人表单、调查表等。OpnForm 提供了一个直观的拖放界面,用户可以快速创建美观的表单,并且只需不到一分钟的时间即可完成。
软件功能:
🚀 无代码构建器,支持无限的表单和提交
📝 各种输入类型:文本、日期、URL、文件上传等等
🌐 可嵌入到任何地方
📧 电子邮件通知
💬 集成(Slack、Webhooks、Discord)
🧠 表单逻辑和自定义
🛡️ 验证码保护
📊 表单分析
安装 在群晖上以 Docker 方式安装。
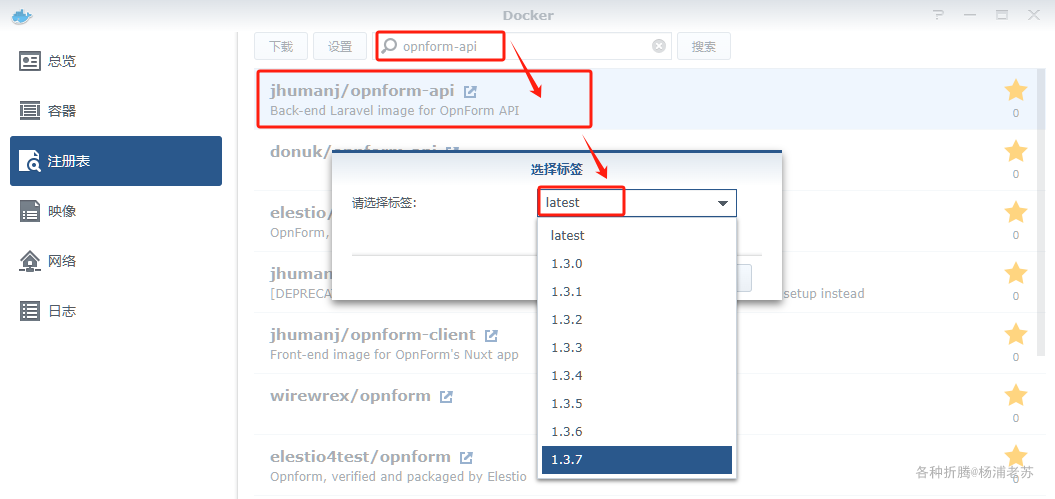
本文写作时,主镜像 jhumanj/opnform-api 的 latest 版本对应为 1.3.7;
软件涉及到多个容器,采用了 docker-compose 方式安装,但没有用官方提供的的脚本安装方式,因为老苏不想下载源码,所以对目录、文件等做了调整
如果你想使用官方的方式,可以参考官方的文档:https://docs.opnform.com/deployment/docker
下面是介绍的是老苏的纯手工安装方式
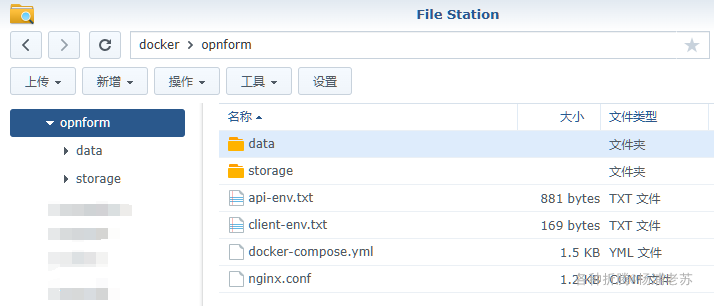
nginx.conf nginx.conf 为 nginx 的配置文件,直接采用官方提供的版本,未做任何修改,源文件地址在:https://github.com/JhumanJ/OpnForm/blob/main/docker/nginx.conf
1
2
3
4
5
6
7
8
9
10
11
12
13
14
15
16
17
18
19
20
21
22
23
24
25
26
27
28
29
30
31
32
33
34
35
36
37
38
39
40
map $original_uri $api_uri { ~^/api(/.*$) $1; default $original_uri ; } server { listen 80 ; server_name opnform; root /app/public; access_log /dev/stdout; error_log /dev/stderr error ; index index.html index.htm index.php; location / { proxy_http_version 1 .1 ; proxy_pass http://ui:3000; proxy_set_header X-Real-IP $remote_addr ; proxy_set_header X-Forwarded-Host $host ; proxy_set_header X-Forwarded-Port $server_port ; proxy_set_header Upgrade $http_upgrade ; proxy_set_header Connection "Upgrade" ; } location ~/(api|open|local\/temp|forms\/assets)/ { set $original_uri $uri ; try_files $uri $uri / /index.php$is_args $args ; } location ~ \.php$ { fastcgi_split_path_info ^(.+\.php)(/.+)$ ; fastcgi_pass api:9000 ; fastcgi_index index.php; include fastcgi_params; fastcgi_param SCRIPT_FILENAME /usr/share/nginx/html/public/index.php; fastcgi_param REQUEST_URI $api_uri ; } }
api-env.txt api-env.txt 为服务端的环境变量文件
1
2
3
4
5
6
7
8
9
10
11
12
13
14
15
16
17
18
19
20
21
22
23
24
25
26
27
28
29
30
31
32
33
34
35
36
37
38
39
40
41
42
43
44
45
46
47
48
49
50
51
APP_NAME ="OpnForm" APP_ENV =productionAPP_KEY =base64:G4UgDosWwGfxUa4YrcvPlzq1DicnSqtW9y5igi4nFX4=APP_DEBUG =false APP_URL =http://192.168 .0.197 :8320 SELF_HOSTED =true LOG_CHANNEL =errorlogLOG_LEVEL =debugFILESYSTEM_DRIVER =localBROADCAST_CONNECTION =logCACHE_STORE =redisCACHE_DRIVER =redisQUEUE_CONNECTION =redisSESSION_DRIVER =redisSESSION_LIFETIME =120 MAIL_MAILER =logMAIL_HOST =MAIL_PORT =MAIL_USERNAME =your@email.comMAIL_PASSWORD =MAIL_ENCRYPTION =MAIL_FROM_ADDRESS =your@email.comMAIL_FROM_NAME =OpnFormAWS_ACCESS_KEY_ID =AWS_SECRET_ACCESS_KEY =AWS_DEFAULT_REGION =us-east-1 AWS_BUCKET =PUSHER_APP_ID =PUSHER_APP_KEY =PUSHER_APP_SECRET =PUSHER_APP_CLUSTER =mt1MIX_PUSHER_APP_KEY ="${PUSHER_APP_KEY}" MIX_PUSHER_APP_CLUSTER ="${PUSHER_APP_CLUSTER}" JWT_TTL =1440 JWT_SECRET =hS2Z7AOJYhZnq4vIQ32tsWQ4SxSYfj5f2jKfCLcWxz0=MUX_WORKSPACE_ID =MUX_API_TOKEN =OPEN_AI_API_KEY=
基于官方的 .env.docker 做了几处修改,源文件在:https://github.com/JhumanJ/OpnForm/blob/main/api/.env.docker
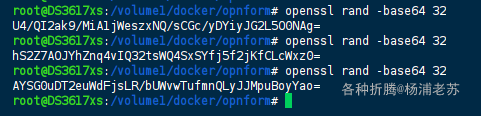
APP_ENV:从 local 改为了 production;APP_KEY:使用 openssl rand -base64 32 生成
但是需要加上前缀 base64:,否则日志会报错
1 NOTICE: PHP message: [2024-10-15 11:28:25] production.ERROR: Unsupported cipher or incorrect key length. Supported ciphers are: aes-128-cbc, aes-256-cbc, aes-128-gcm, aes-256-gcm. {"exception":"[object] (RuntimeException(code: 0): Unsupported cipher or incorrect key length. Supported ciphers are: aes-128-cbc, aes-256-cbc, aes-128-gcm, aes-256-gcm. at /usr/share/nginx/html/vendor/laravel/framework/src/Illuminate/Encryption/Encrypter.php:62)
APP_URL:需要根据实际情况进行修改,其中 192.168.0.197 为群晖主机的 IP,而 8320 是准备分配给 OpnForm 的本机端口;JWT_SECRET:使用 openssl rand -base64 32 生成;
其他参数未做修改,包括 OpenAI、邮件、AWS 存储和 PUSHER 提醒等,如果你有需要可以自习修改,官方提供了环境变量的说明:https://docs.opnform.com/configuration/environment-variables
client-env.txt client-env.txt 是前端页面的环境变量文件
1
2
3
4
5
NUXT_PUBLIC_APP_URL =/NUXT_PUBLIC_API_BASE =/apiNUXT_PRIVATE_API_BASE =http://ingress/apiNUXT_PUBLIC_ENV =devFRONT_API_SECRET =AYSG0uDT2euWdFjsLR/bUWvwTufmnQLyJJMpuBoyYao=
基于官方的 .env.docker 做了一处新增,源文件在:https://github.com/JhumanJ/OpnForm/blob/main/client/.env.docker
FRONT_API_SECRET:也是使用 openssl rand -base64 32 生成;
docker-compose.yml 将下面的内容保存为 docker-compose.yml 文件
官方的源文件:https://github.com/JhumanJ/OpnForm/blob/main/docker-compose.yml
老苏做了微调,因为参数比较多,保留了官方的锚点,使得容器 opnform-api-worker 可以复用 opnform-api 的环境变量参数
1
2
3
4
5
6
7
8
9
10
11
12
13
14
15
16
17
18
19
20
21
22
23
24
25
26
27
28
29
30
31
32
33
34
35
36
37
38
39
40
41
42
43
44
45
46
47
48
49
50
51
52
53
54
55
56
57
58
59
60
61
version: '3' services: api: &api image: jhumanj/opnform-api:latest container_name: opnform-api environment: &api-environment DB_HOST: db REDIS_HOST: redis DB_DATABASE: ${DB_DATABASE:-forge} DB_USERNAME: ${DB_USERNAME:-forge} DB_PASSWORD: ${DB_PASSWORD:-forge} DB_CONNECTION: ${DB_CONNECTION:-pgsql} FILESYSTEM_DISK: local LOCAL_FILESYSTEM_VISIBILITY: public env_file: - ./api-env.txt volumes: - ./storage:/usr/share/nginx/html/storage:rw api-worker: image: jhumanj/opnform-api:latest container_name: opnform-api-worker command: php artisan queue:work environment: <<: *api-environment IS_API_WORKER: "true" env_file: - ./api-env.txt volumes: - ./storage:/usr/share/nginx/html/storage:rw ui: image: jhumanj/opnform-client:latest container_name: opnform-ui env_file: - ./client-env.txt redis: image: redis:7 container_name: opnform-redis db: image: postgres:16 container_name: opnform-db environment: POSTGRES_DB: ${DB_DATABASE:-forge} POSTGRES_USER: ${DB_USERNAME:-forge} POSTGRES_PASSWORD: ${DB_PASSWORD:-forge} volumes: - ./data:/var/lib/postgresql/data ingress: image: nginx:1 container_name: opnform-ingress volumes: - ./nginx.conf:/etc/nginx/templates/default.conf.template ports: - 8320 :80
这部分理论上只要修改 opnform-ingress 中的本机端口,使之不产生冲突就可以
然后执行下面的命令
1 2 3 4 5 6 7 8 9 10 mkdir -p /volume1/docker/opnform/{data,storage}cd /volume1/docker/opnformdocker-compose up -d
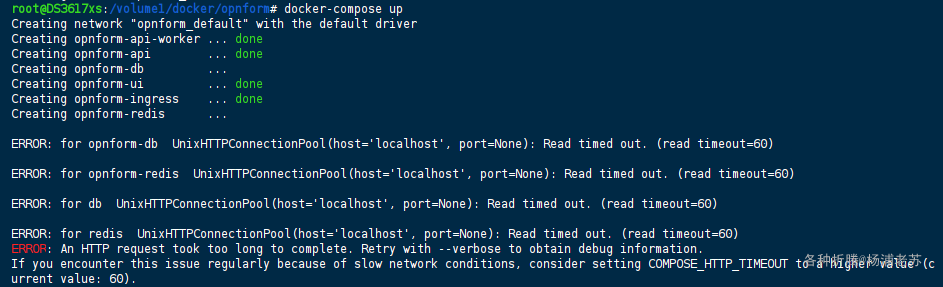
注意事项 一键启动过程中或者之后,可能会遇到一些问题,老苏把自己遇到的放在这里,供大家参考
超时问题 因为容器比较多,可能在一键启动过程中会出现超时
可以先执行
1 2 export COMPOSE_HTTP_TIMEOUT=300
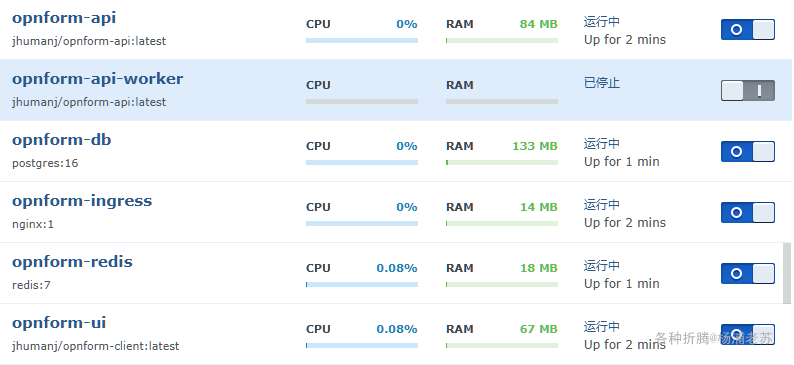
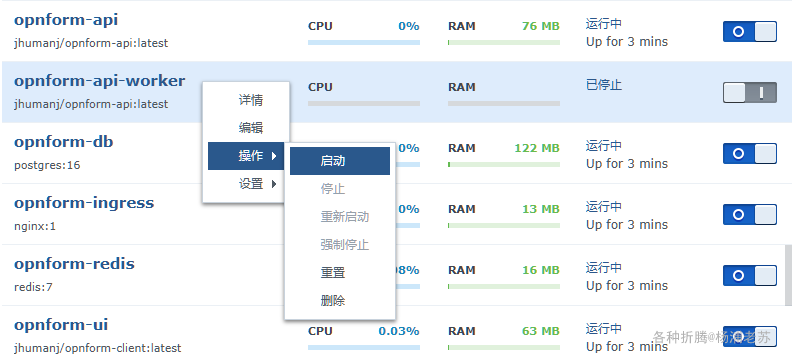
容器停止 可能会遇到某个容器停止
可以尝试强制启动
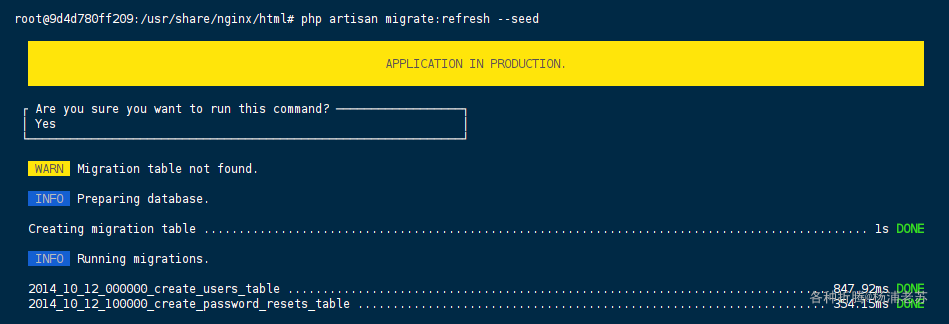
登录无反应 假如一键启动后,使用默认的账号密码登录没有反应,很可能是数据库没有 migrate 成功,导致创建默认凭据失败
可以单独再执行一次
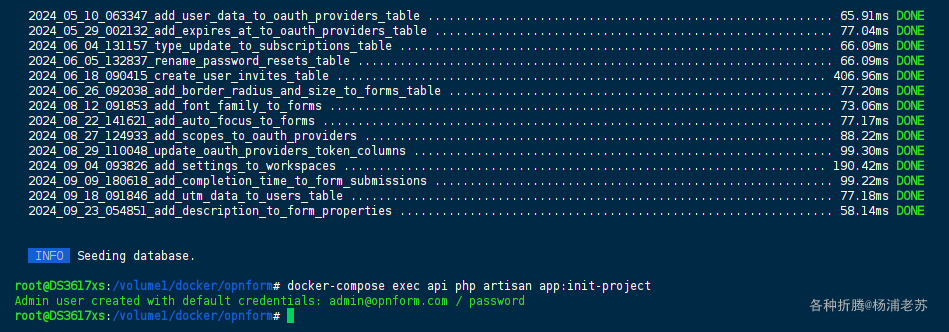
1 2 3 4 5 docker exec --user root -it opnform-api /bin/bash php artisan migrate:refresh --seed
或者只用一条命令来解决
1 2 docker-compose exec api php artisan migrate:refresh --seed
接下来创建默认凭据就可以了
1 2 docker-compose exec api php artisan app:init-project
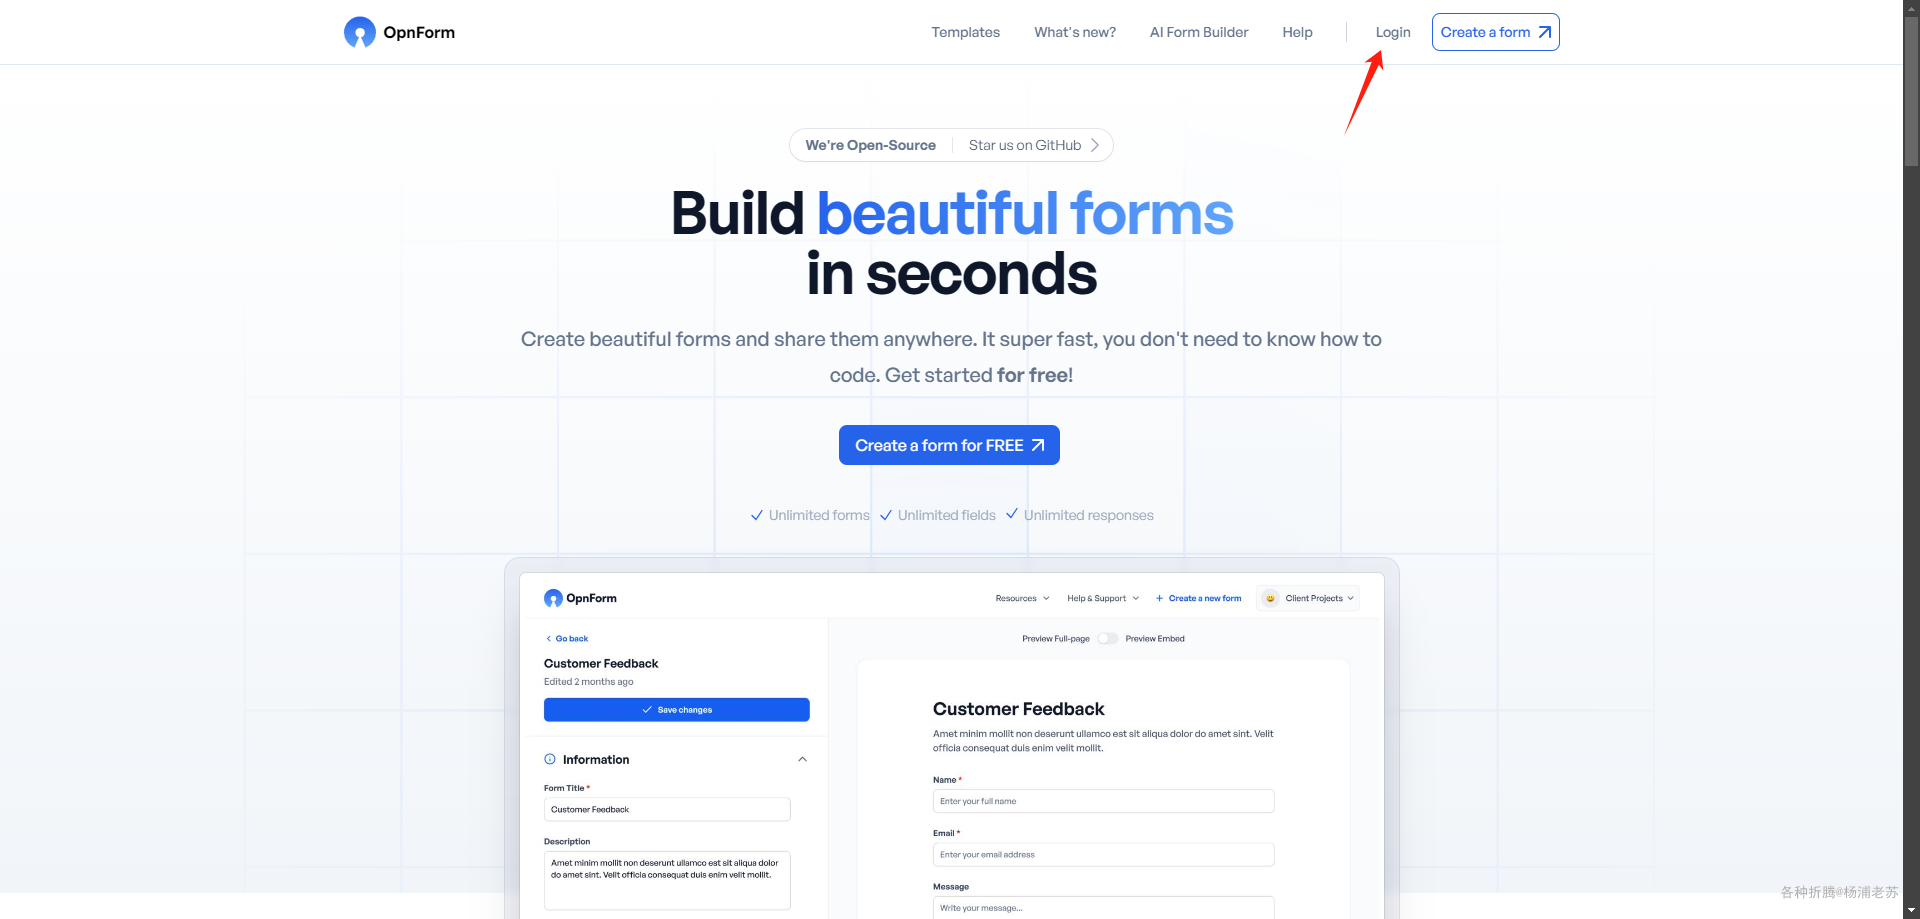
运行 在浏览器中输入 http://群晖IP:8320 就能看到主界面
点左上角的 Login 进入登录界面
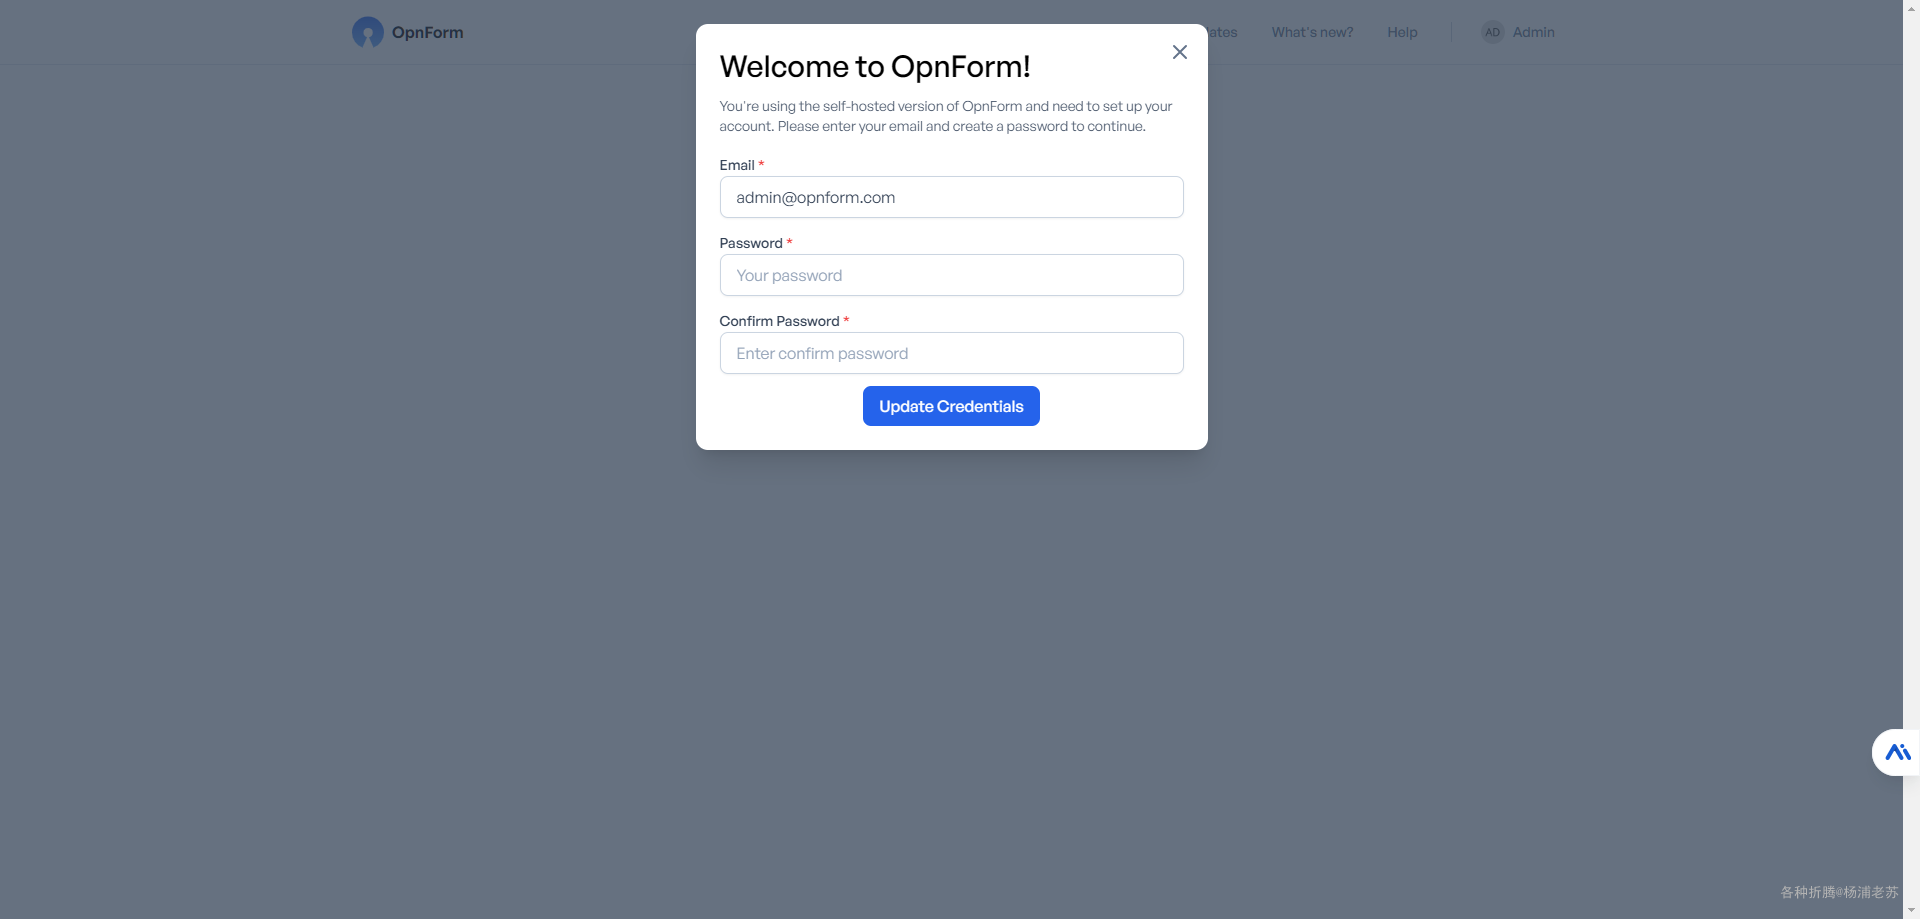
默认凭据,可以在 opnform-api 的日志中找到
电子邮件:admin@opnform.com
密码:password
自托管版本禁止公开注册。请使用管理员帐户邀请其他用户
如果登录没反应,请参考上一个章节
首次登录后,系统将提示您更改电子邮件和密码
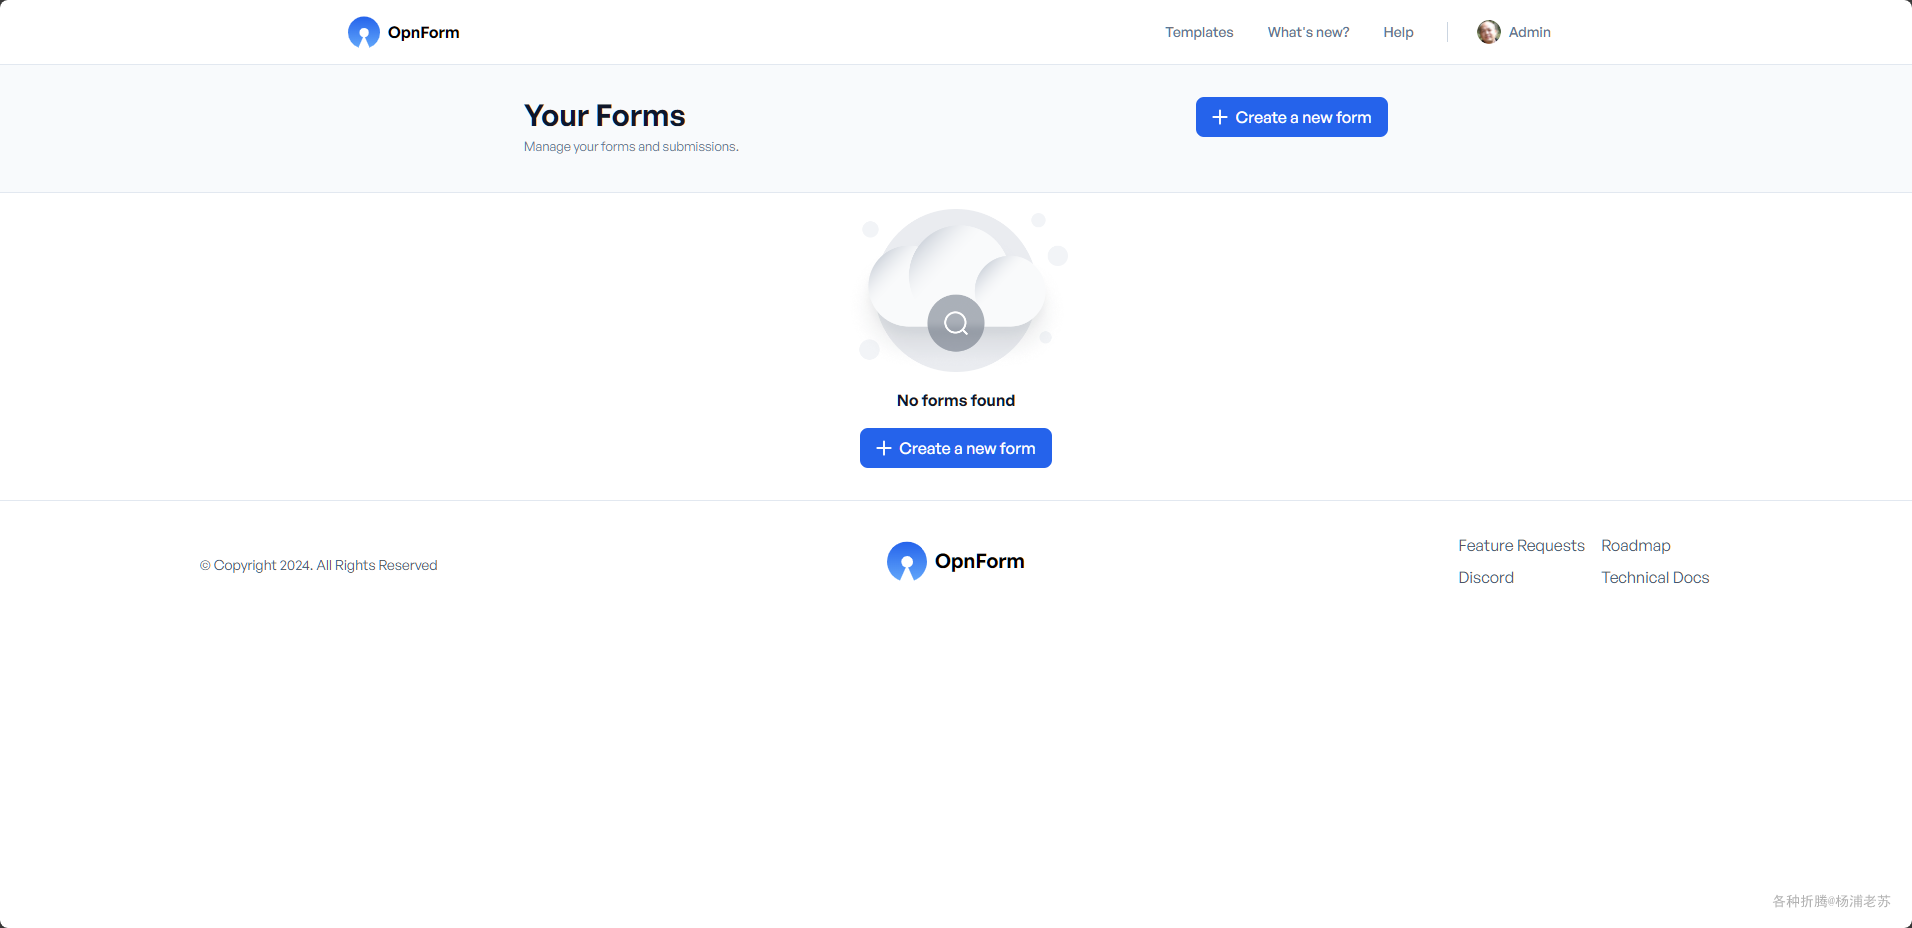
设置完成后,会回到登录界面,需要用新账号重新登录,登录成功后的主界面
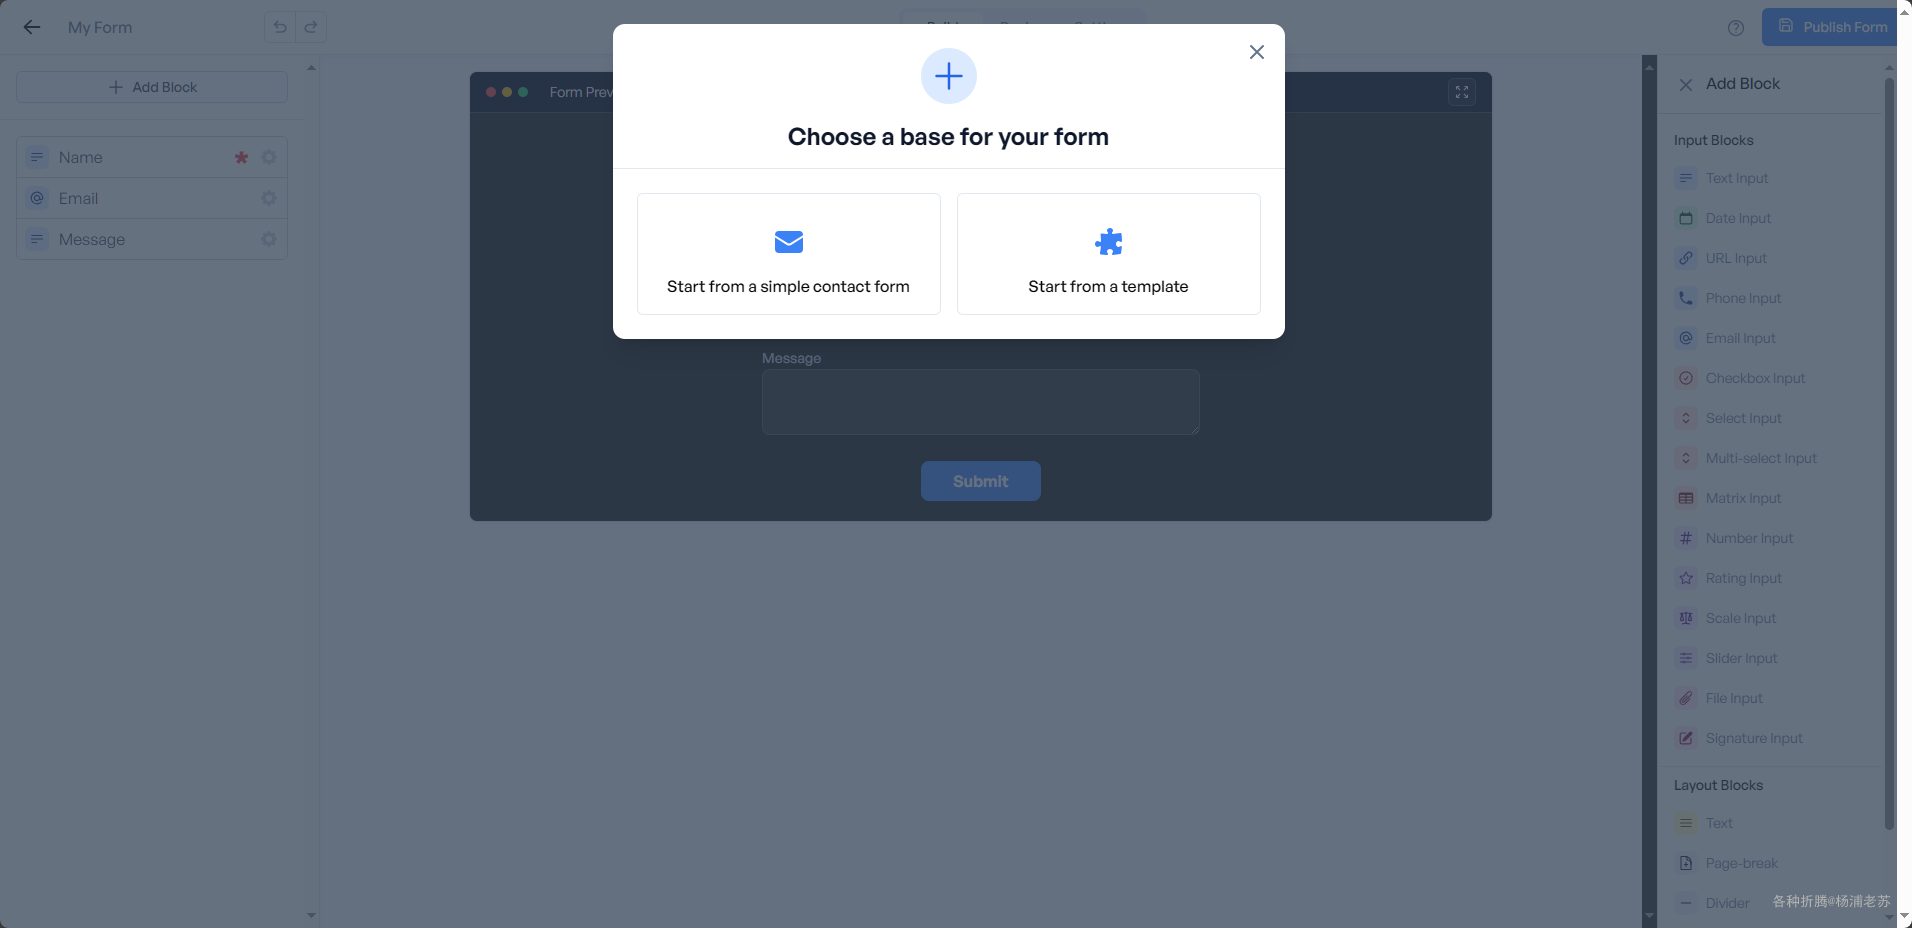
新建 form
可以从一个简单的联系人表开始,也可以选择从模版导入
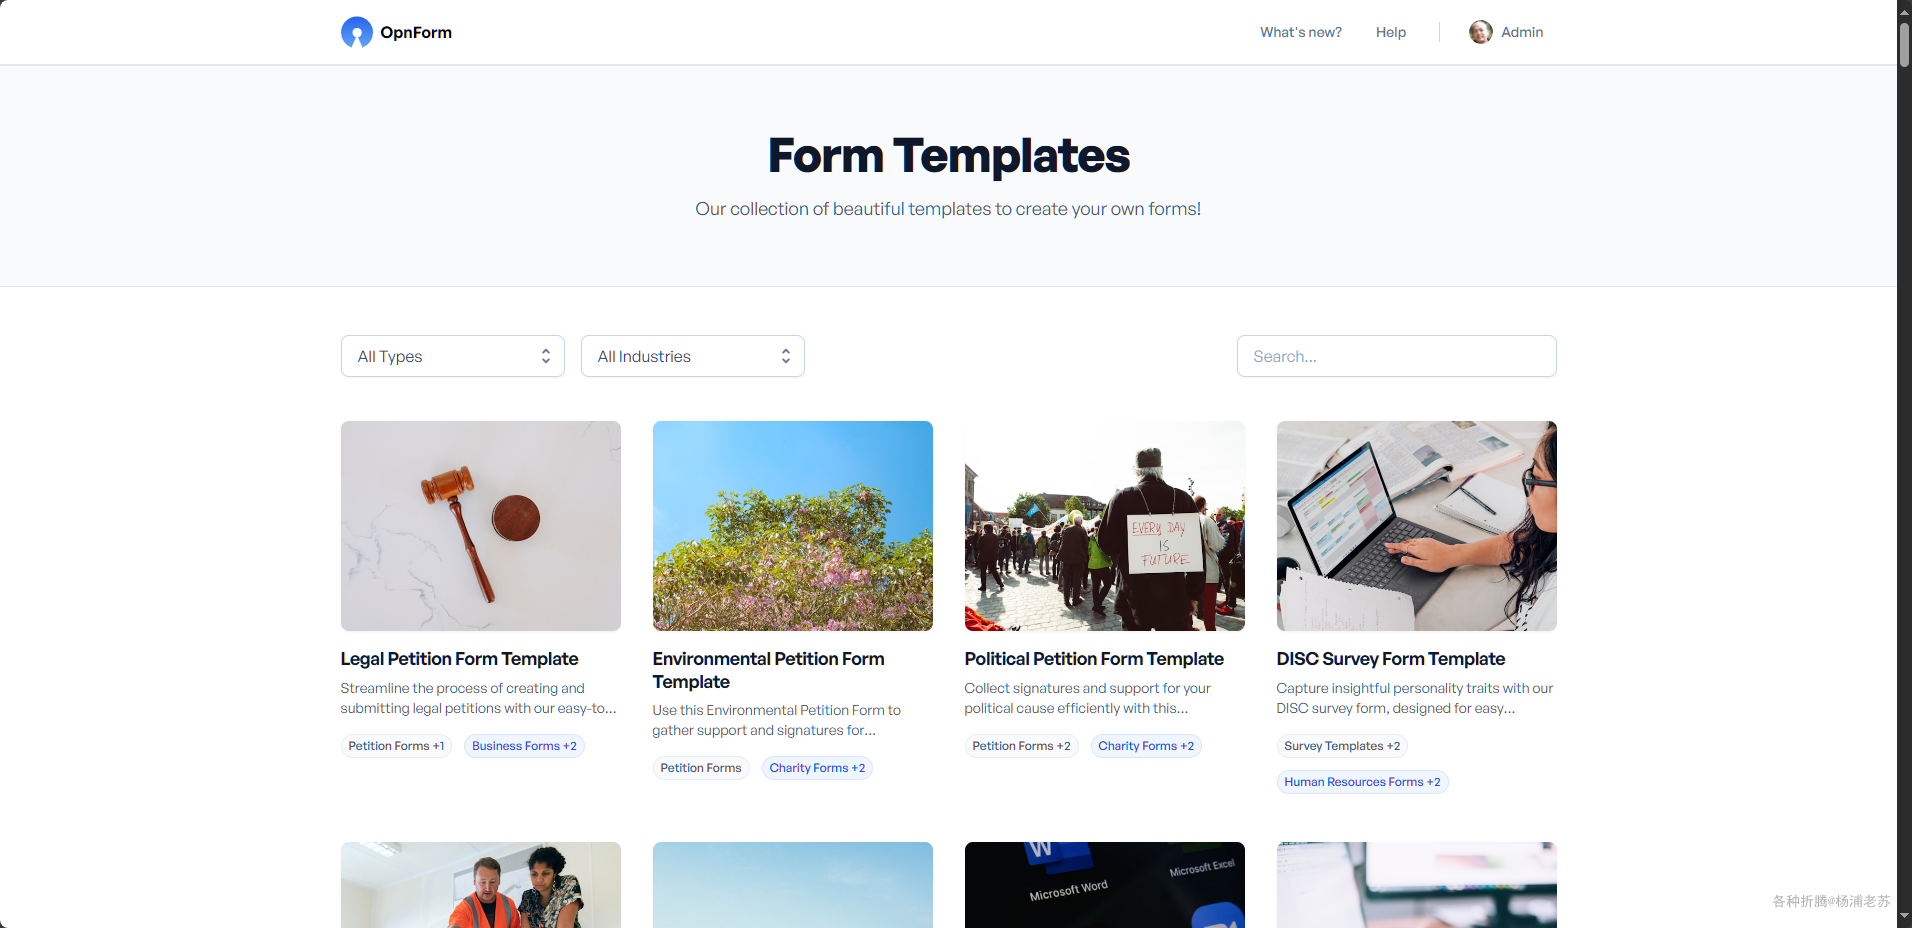
模版挺多的
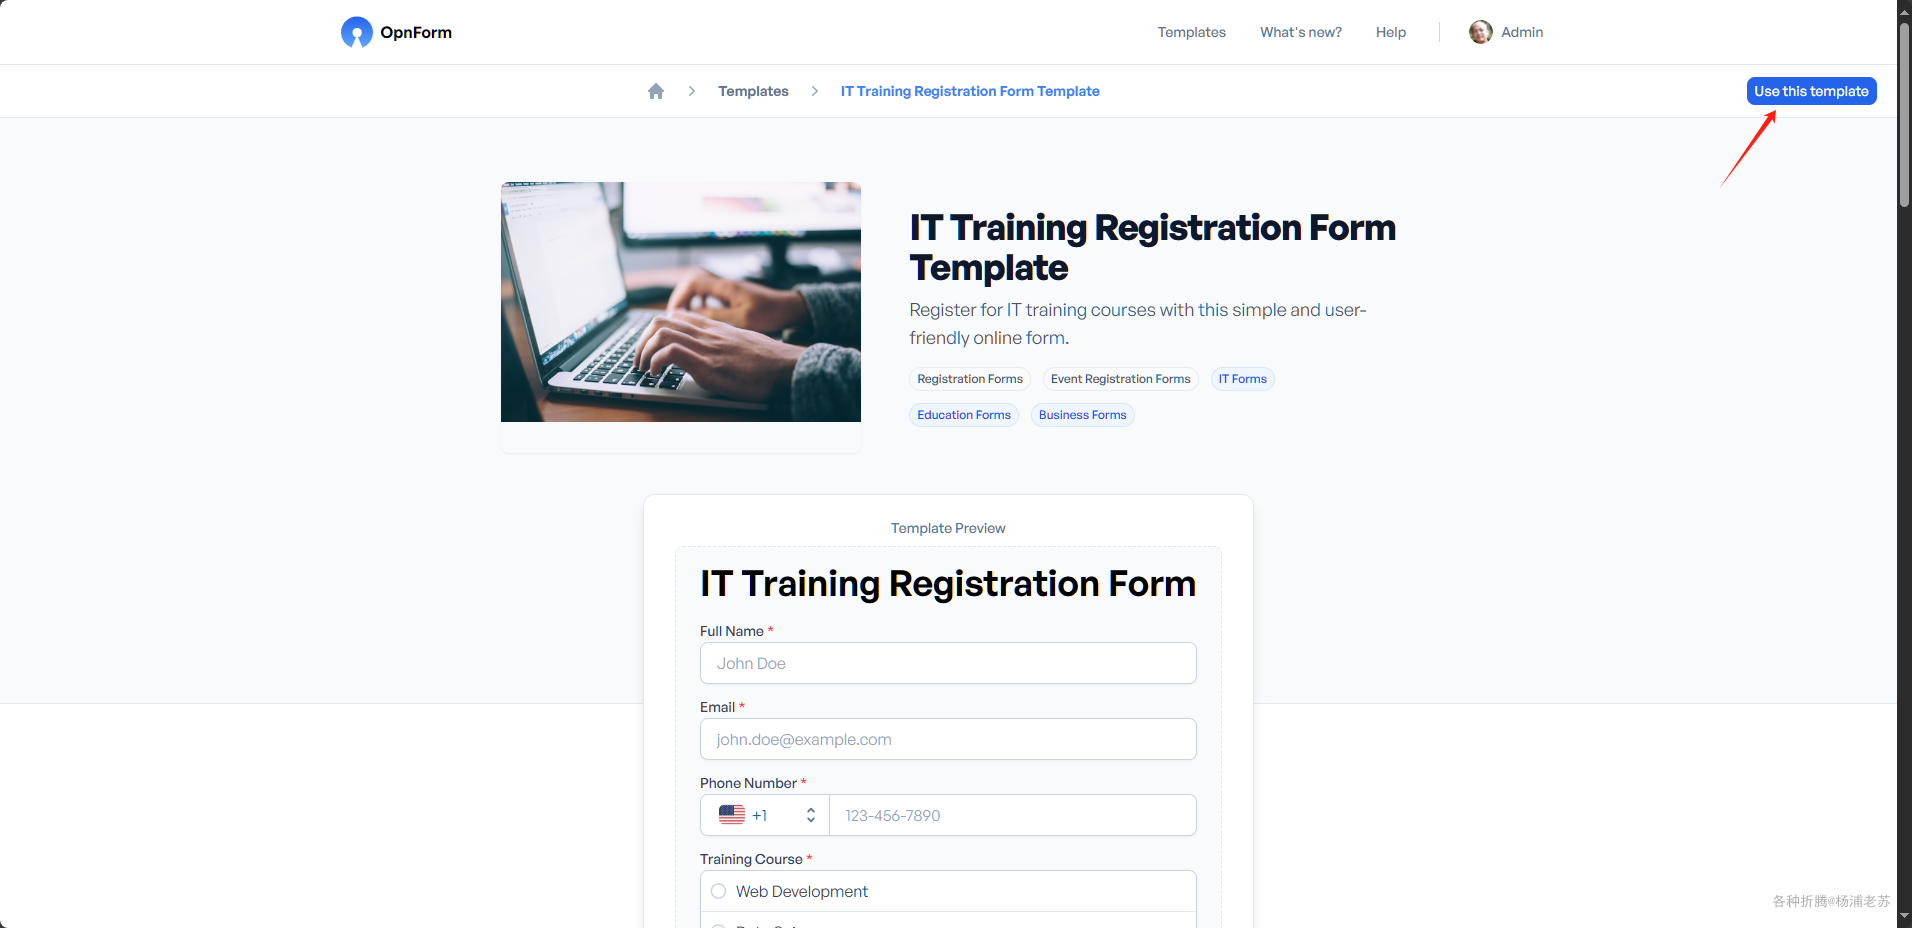
进入模版有说明和预览,点右上角的 Use this template 进行选择
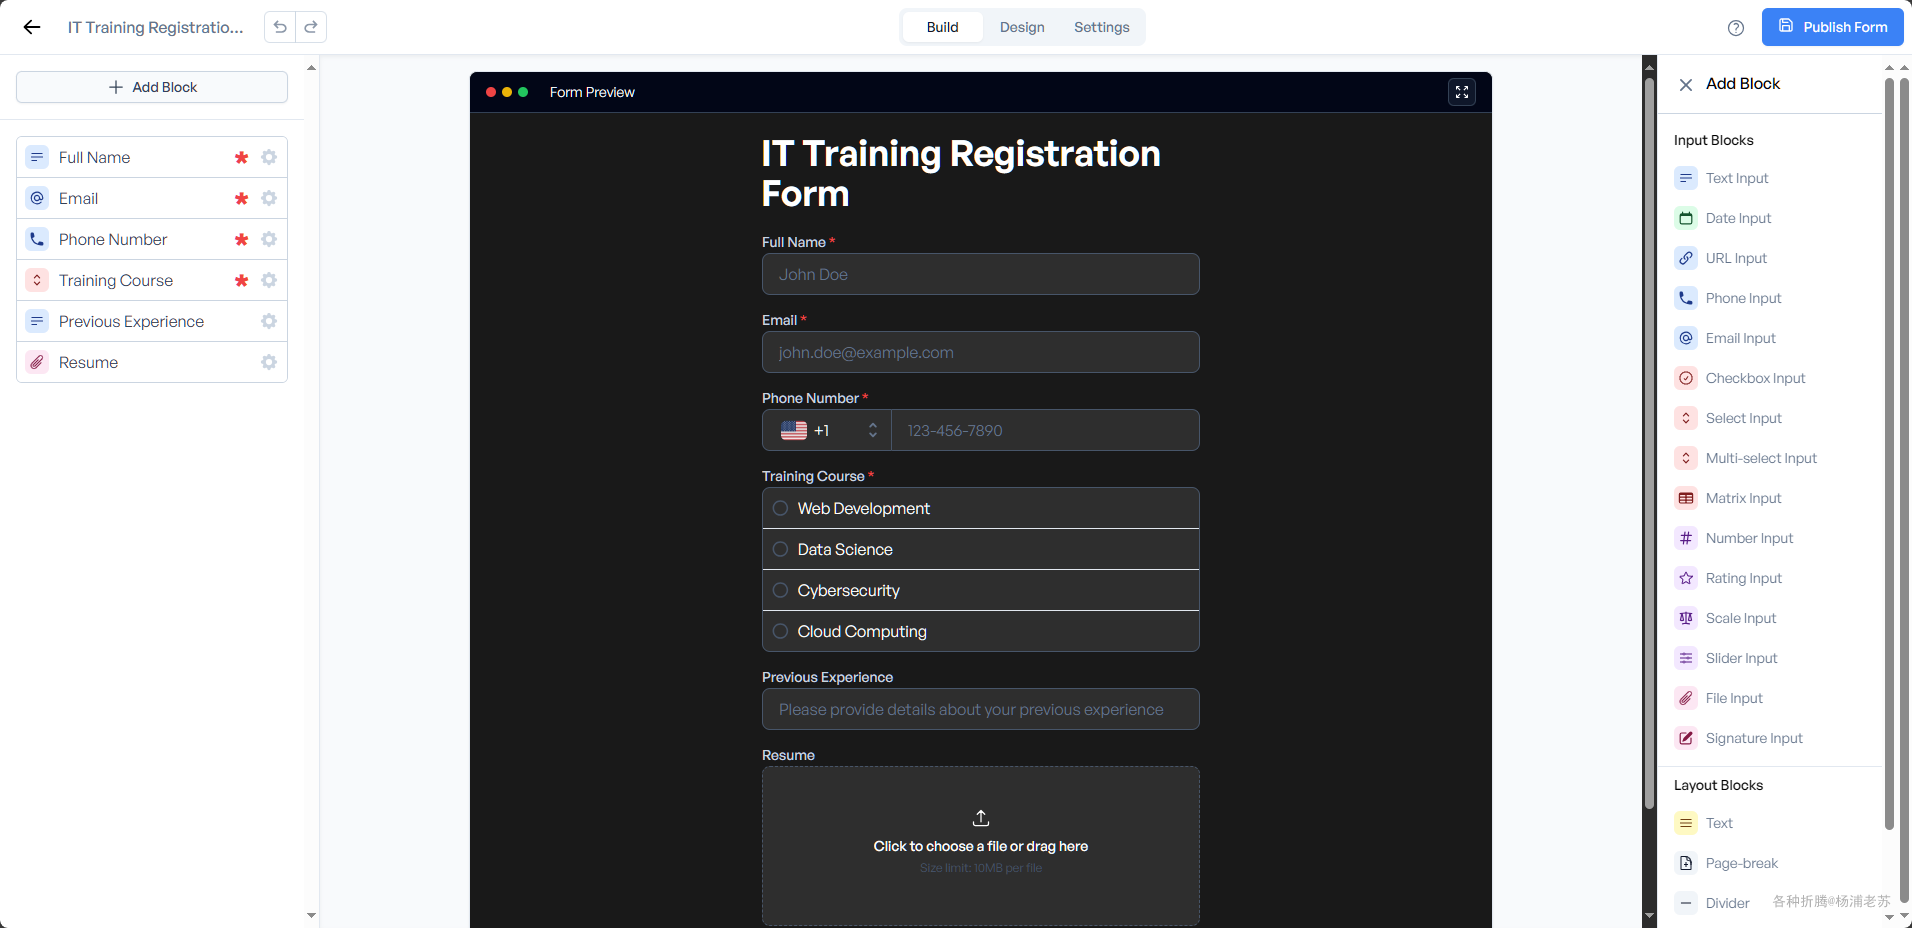
选择后可以进入到编辑模式
你可以根据需要进行修改,也可以直接发布
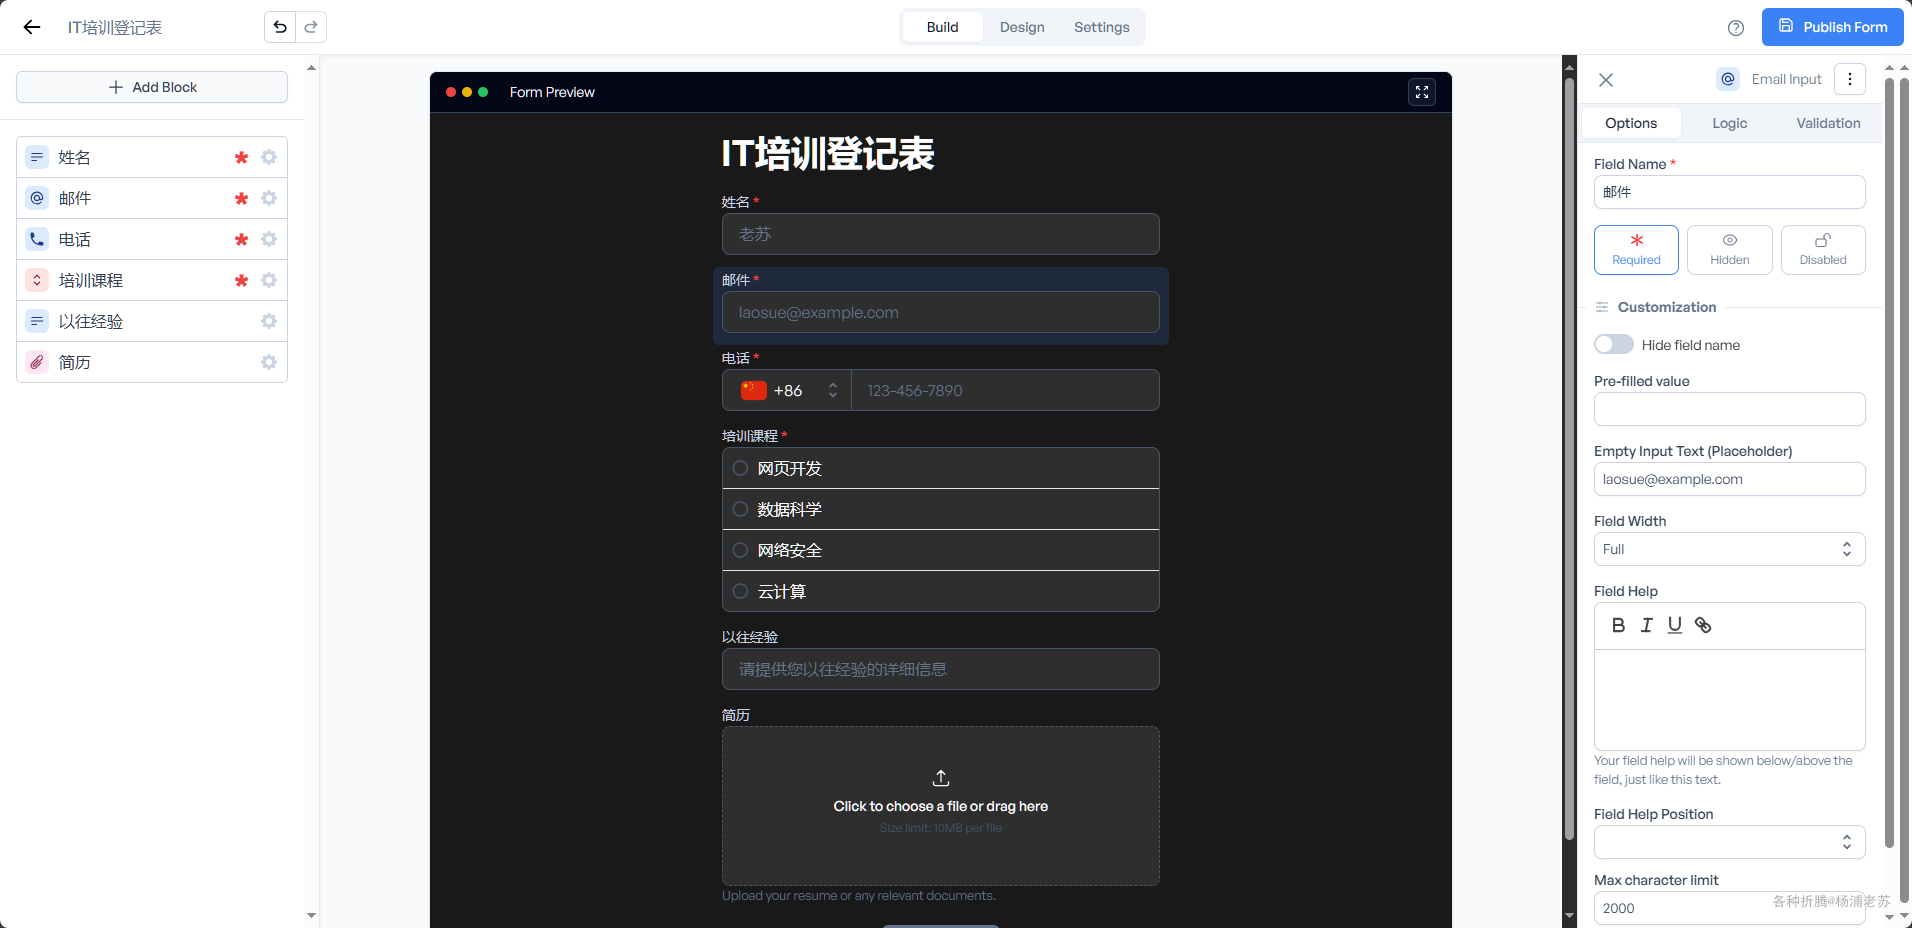
做了简单的修改,将英文改成了中文
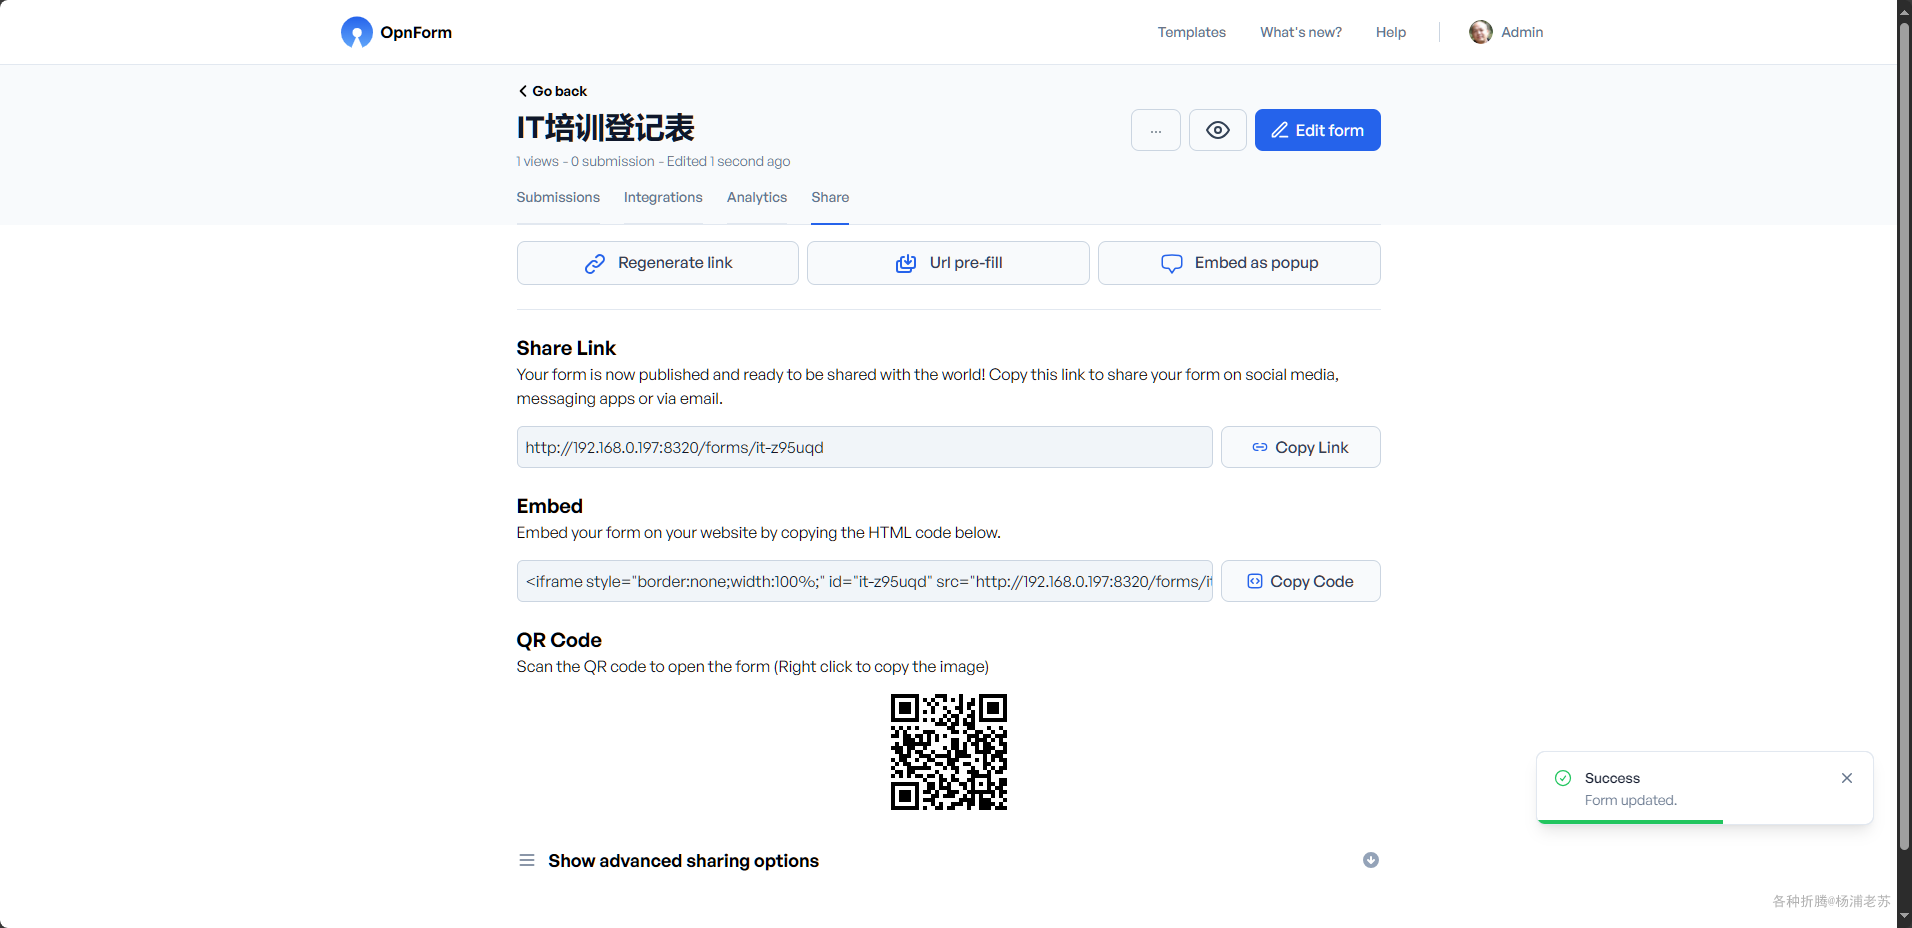
点右上角的 Publish Form 发布
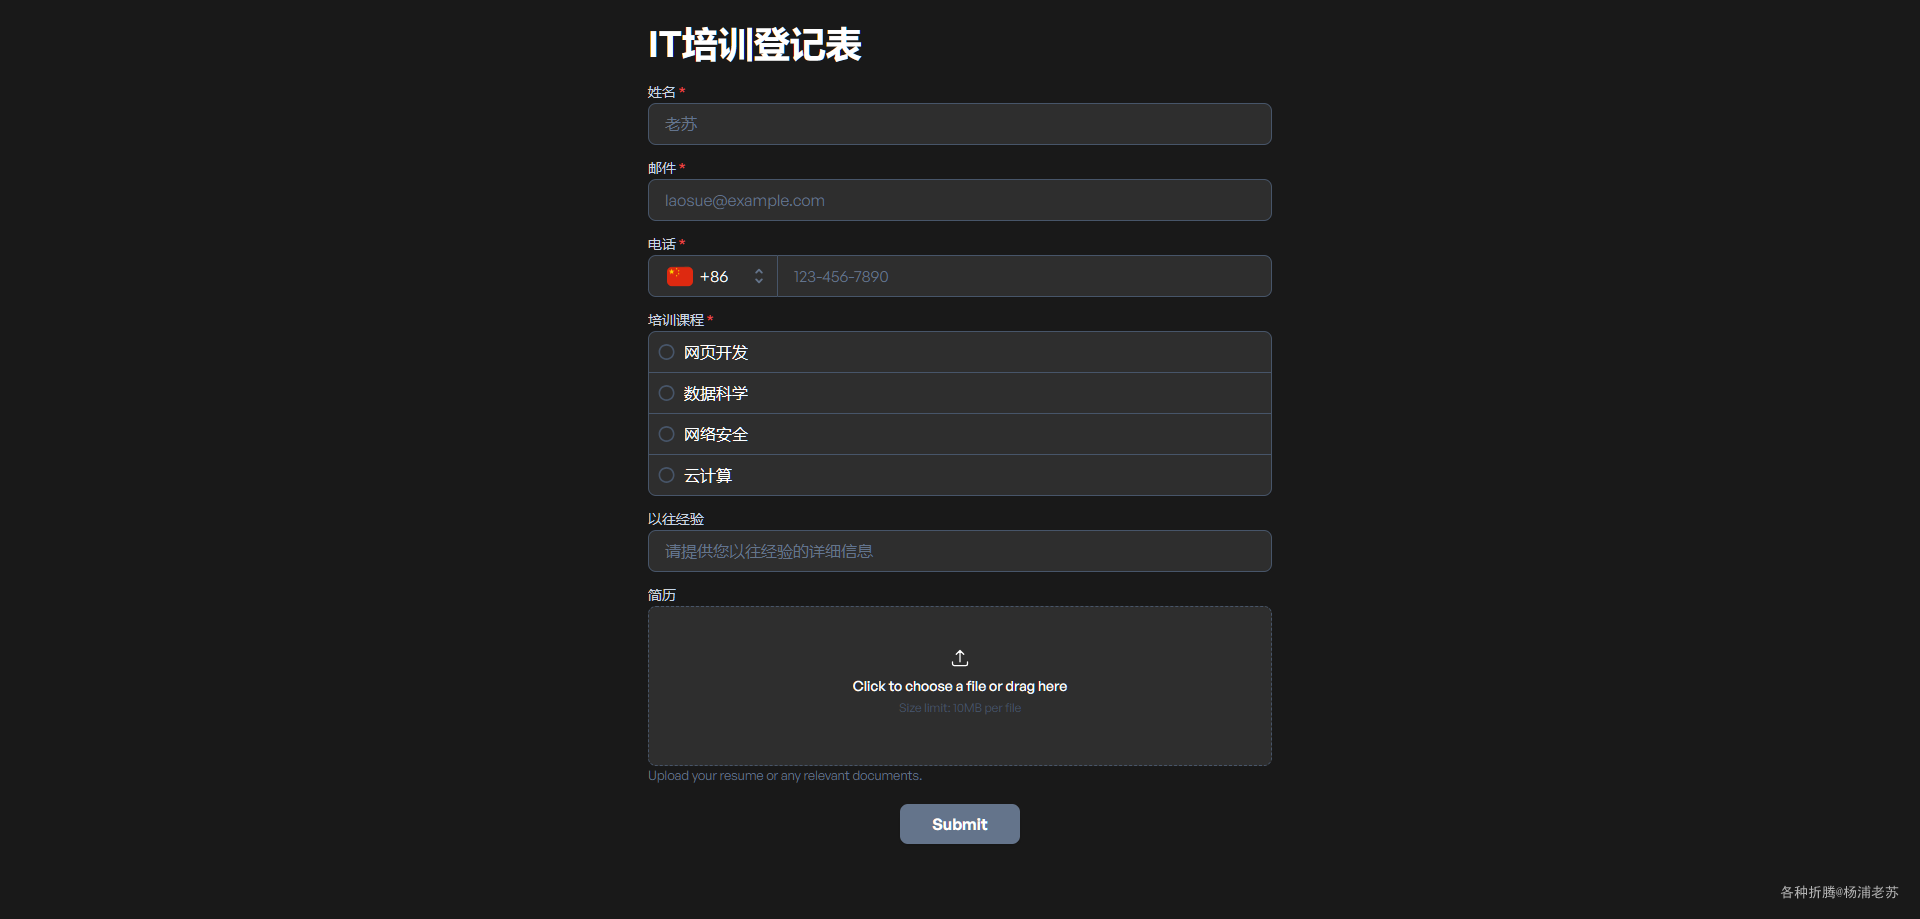
在其他机器上打开链接
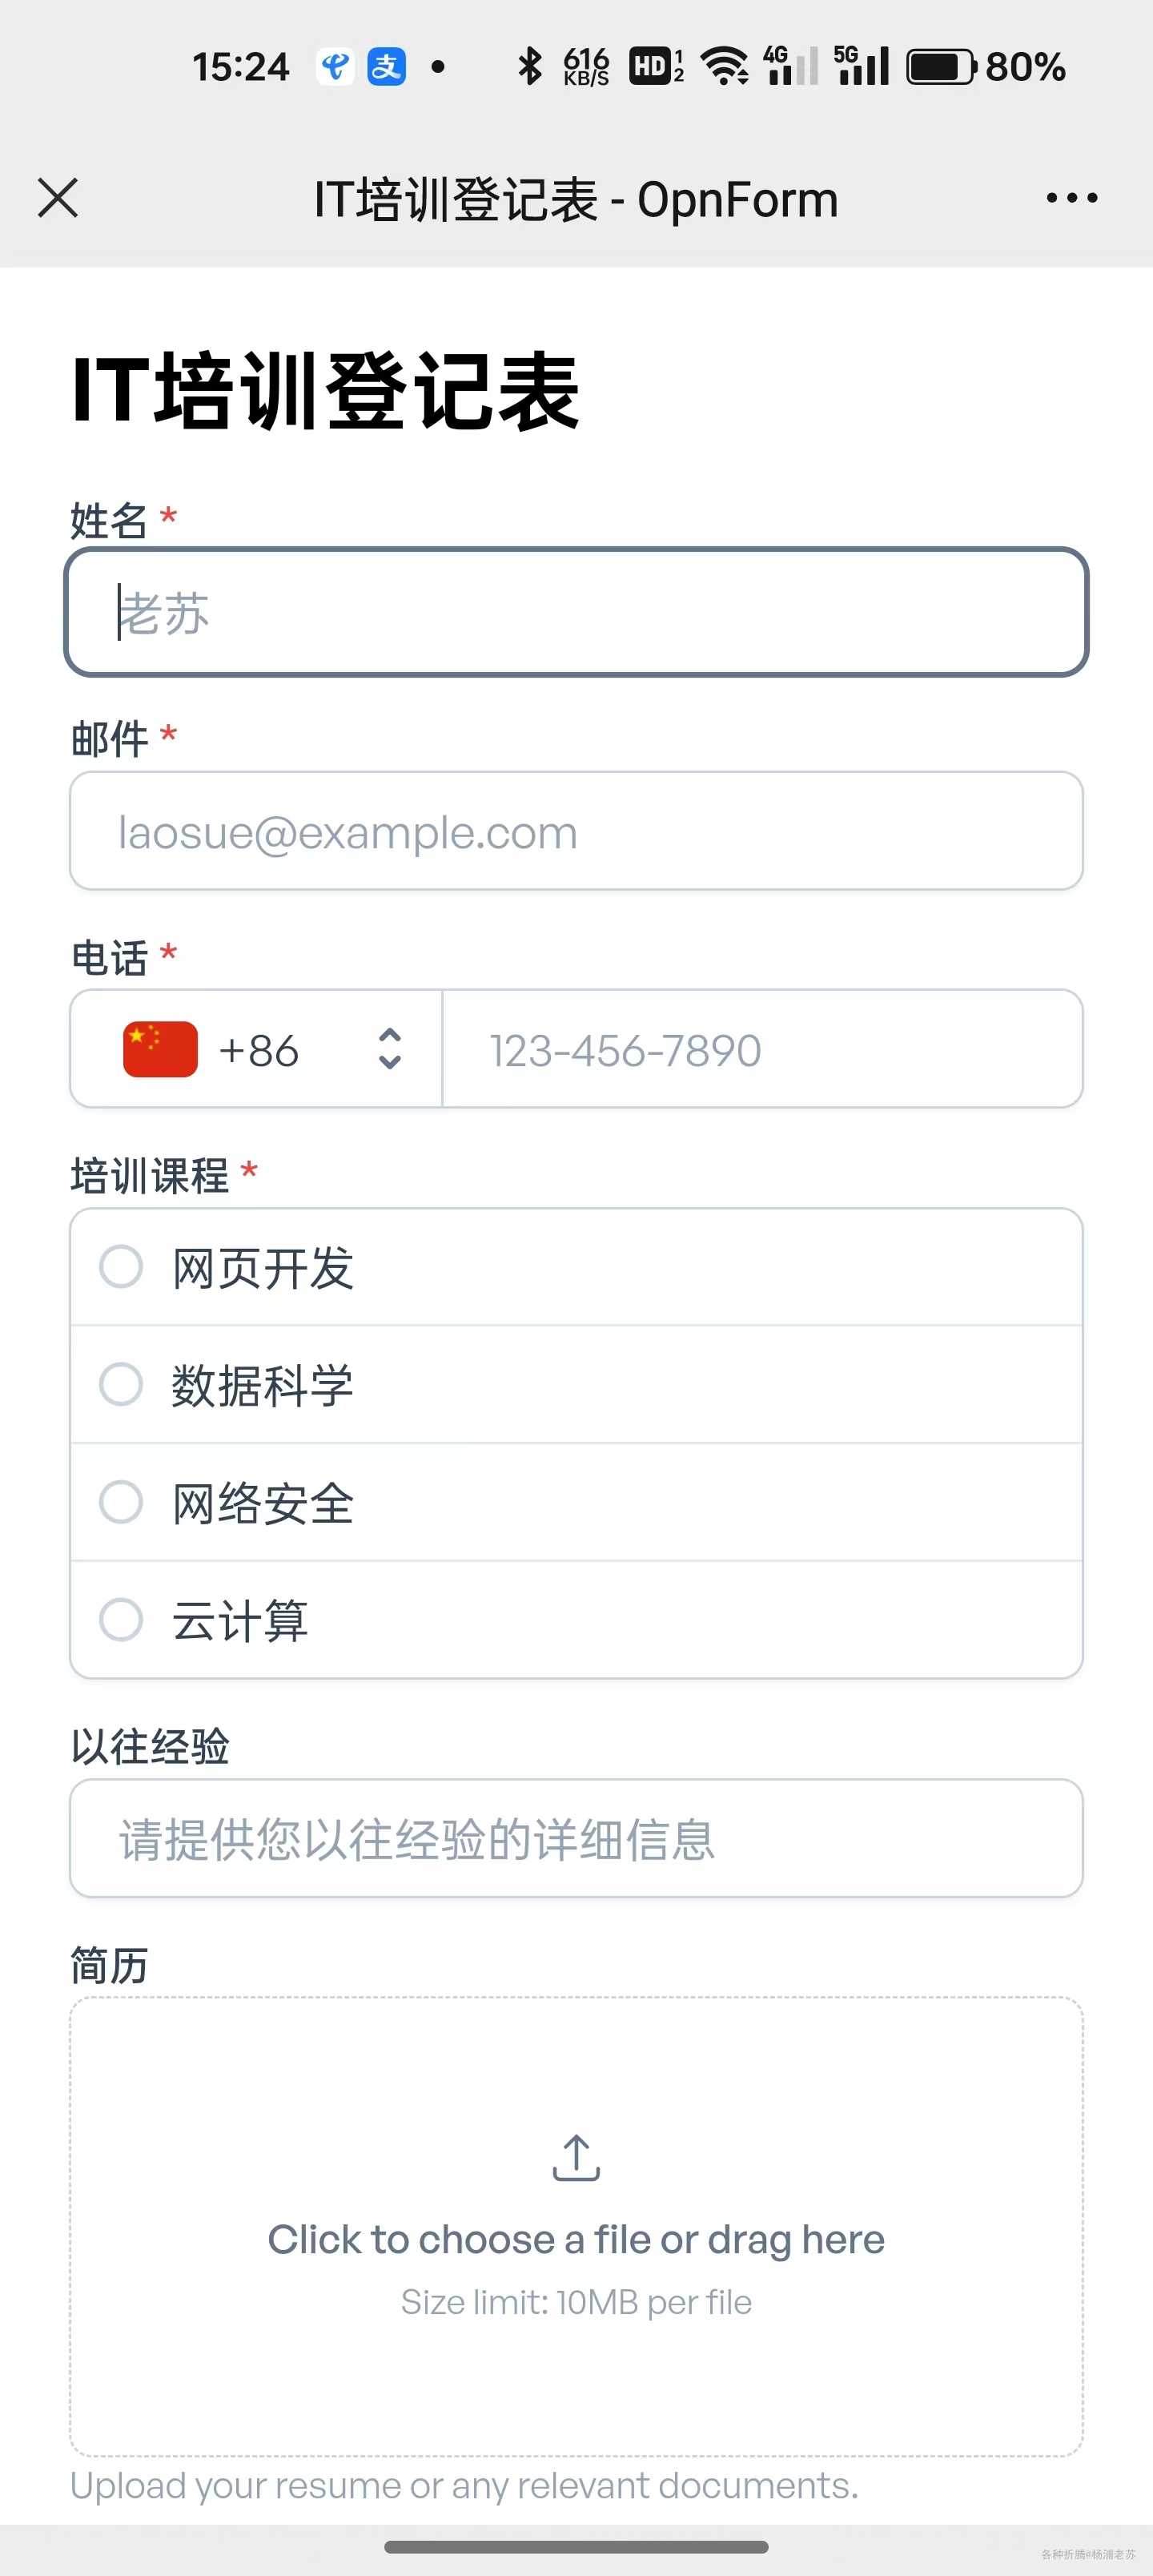
手机上扫描二维码
参考文档
JhumanJ/OpnForm: Beautiful Open-Source Form Builderhttps://github.com/JhumanJ/OpnForm
Beautiful forms & Surveys - OpnFormhttps://opnform.com/
Docker - OpnForm Technical Docshttps://docs.opnform.com/deployment/docker
My open-source form builder just reached 2k stars on Github! : r/selfhostedhttps://www.reddit.com/r/selfhosted/comments/1g3ego7/my_opensource_form_builder_just_reached_2k_stars/